|
|
New Zealand Trout Flies
|
|
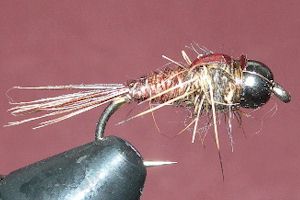
Pheasant Tail (Hare & Pheasant)
 |
|
|
|
|
Fly Tying Details; |
|
|
Name: |
Pheasant Tail (Hare &
Pheasant) |
|
|
Sizes: |
10 - 16 |
|
|
Hook: |
Kamasan B175 or Tiemco 3769 (these are both short,
strong Nymph hooks |
|
|
Thread: |
Danville Pre Waxed Thread
6/0 Brown or Black |
|
|
Tail: |
Pheasant tail fibers |
|
|
Body: |
Pheasant tail fibers |
|
|
Ribbing: |
Copper wire - Fine |
|
|
Thorax |
Hare Fur with plenty of guard hairs |
|
|
Wingcase: |
Body Stretch or Thin Skin -
Brown or Black |
|
|
Weight: |
Tungsten - Black or Gold
and Lead wire |
|
|
Comment: |
A
popular variation of the Pheasant Tail. The guard
hairs used in the thorax represent legs and are what makes this fly a
success. I have a preference for sizes #14 & #16. I tie them on these
shorter hooks because there is more hook in relation to the fly size,
giving better hook ups. |
|
|
|
|
|
Step by Step Tying Instructions: Pheasant Tail -
Hare |
|

This is an easy and
effective fly to tie.
Firstly choose the size bead you want for the
weight of the fly, pictured is a #10 hook with a #3.8mm tungsten bead.
Apply glue to the hook shank then wrap the hook shank with lead wire
for additional weight. I've used .025 lead wire here. The length of
wire is important as it will help form the taper to shape the body of
the nymph.
Bind the lead with a layer of thread and apply more glue to hold all
firmly in place
|
|
 Next we
tie in the tail which is approximately 10 pheasant tail fibers and
some copper wire. It's hard to see but I have created a taper with the
thread behind the lead wire. Next wind the pheasant tail fibers
forward to create a tapered body. (see next picture). Next we
tie in the tail which is approximately 10 pheasant tail fibers and
some copper wire. It's hard to see but I have created a taper with the
thread behind the lead wire. Next wind the pheasant tail fibers
forward to create a tapered body. (see next picture). |
|
 Then
wind the wire forward over the pheasant tail fibers to the thorax, I
tend to wind it the opposite way to help hold all in place, a few
extra winds around the thorax area and back over itself then tie in
with the thread. Then
wind the wire forward over the pheasant tail fibers to the thorax, I
tend to wind it the opposite way to help hold all in place, a few
extra winds around the thorax area and back over itself then tie in
with the thread.
Apply more glue to the thorax area
|
|
 Next
is to tie in a thin strip of Body Stretch which will form the wing
case, followed by the dubbing for the thorax. Next
is to tie in a thin strip of Body Stretch which will form the wing
case, followed by the dubbing for the thorax.
I've used some plain hare's
fur here for the first few winds then I use mainly the guard hairs
from the centre back of a hares skin for the last few wraps to give
the hairy look
|
|
 Once
the dubbing is added, bring the Body Stretch forward and tie in firmly
with several winds of thread, then stretch it out and trim off the
excess. Once
the dubbing is added, bring the Body Stretch forward and tie in firmly
with several winds of thread, then stretch it out and trim off the
excess.
Finish with a whip finish and apply more glue to the thread and your
nymph is finished
|